容器化部署 ComfyUI-ReActor 并通过 api 调用
ComfyUI-ReActor 是一个用于 ComfyUI 的快速简单的换脸扩展节点。它利用多个模型组合来实现人脸检测、人脸交换和人脸修复。本文介绍了 ComfyUI-ReActor 的快速部署与 简单的 api 调用。
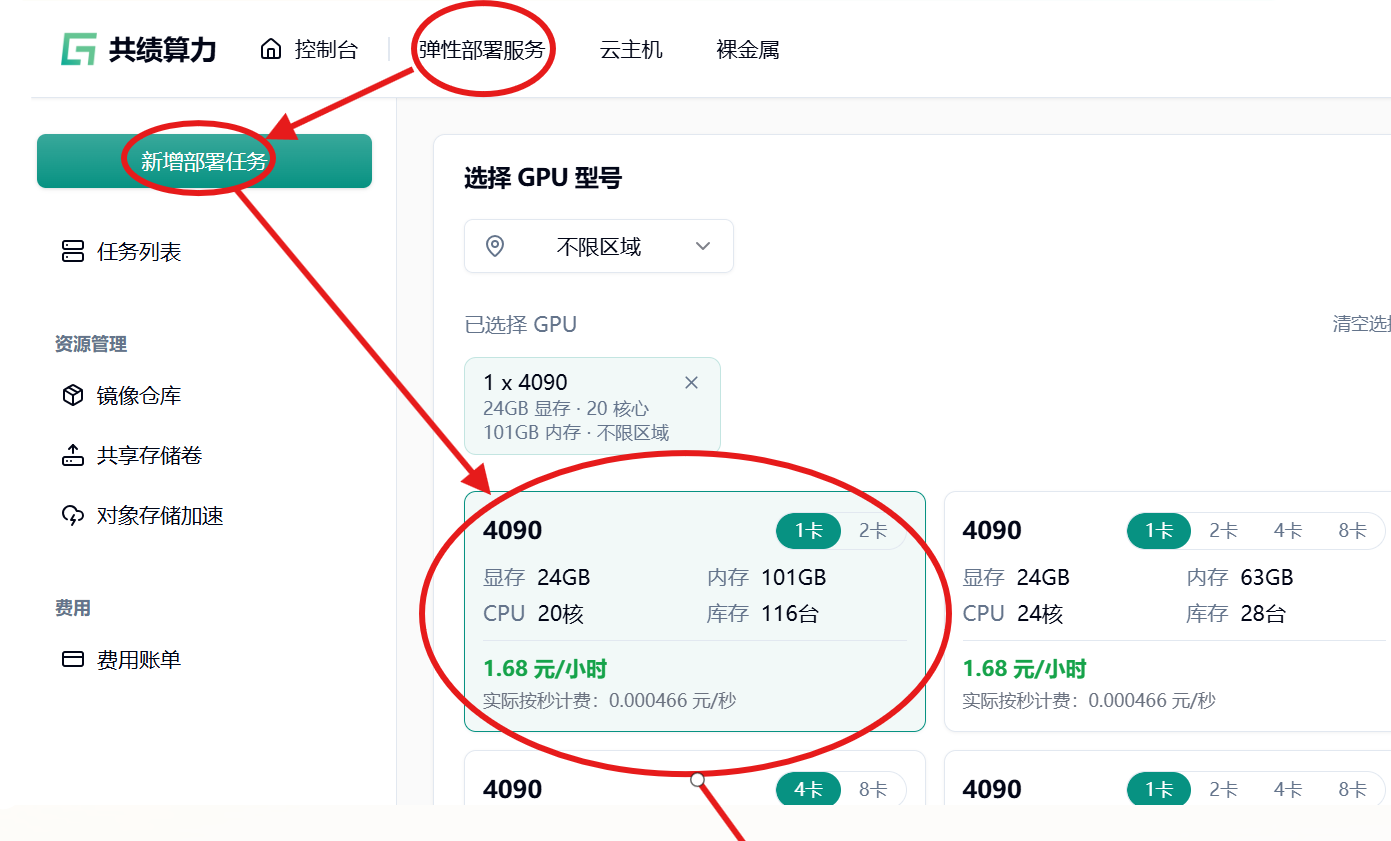
访问共绩算力控制台 https://console.suanli.cn/serverless/idc
依次访问【弹性部署服务】-> 【新增部署任务】 -> 【选择 GPU 型号】-> 下拉至【服务配置】页面
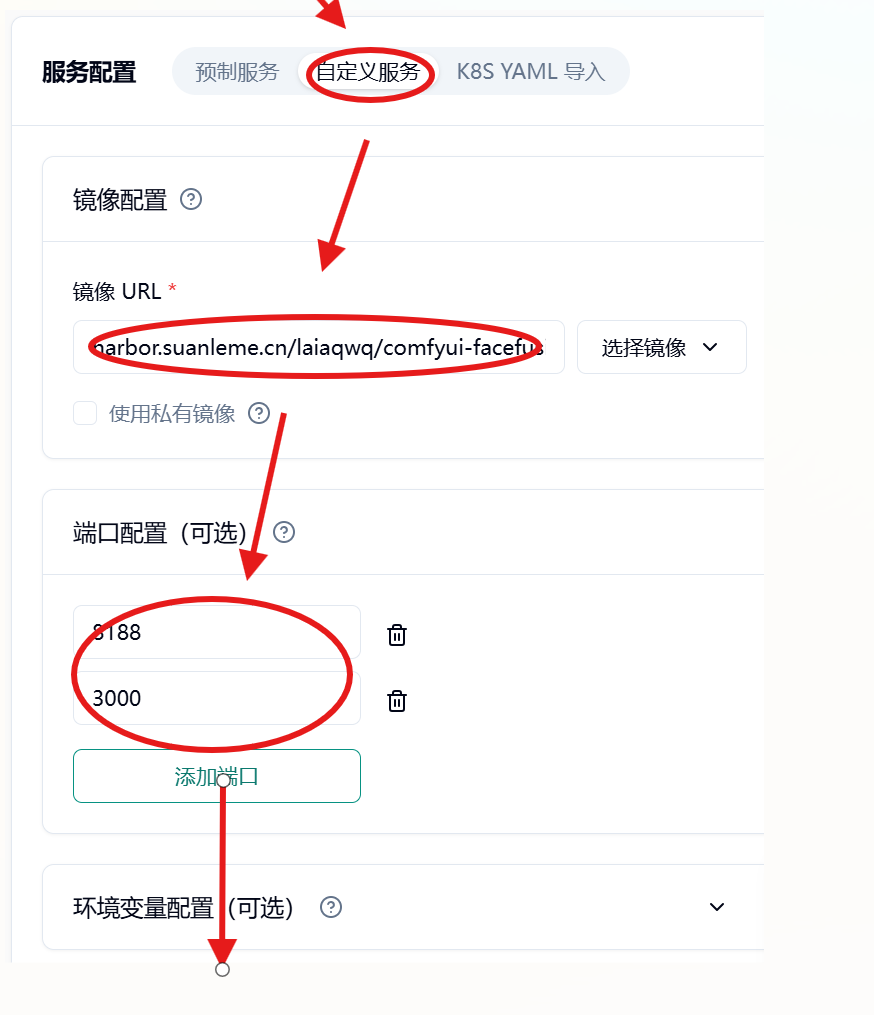
在【服务配置】选项选择【自定义服务】-> 【镜像 url】->
harbor.suanleme.cn/laiaqwq/comfyui-facefusio-api:0.1.7
【端口配置】 ->
7860
3000
接着下拉【部署服务】
等待服务部署完毕,需要 5-30 分钟 (镜像拉取 + 启动)。
部署后平台会自动暴露出服务
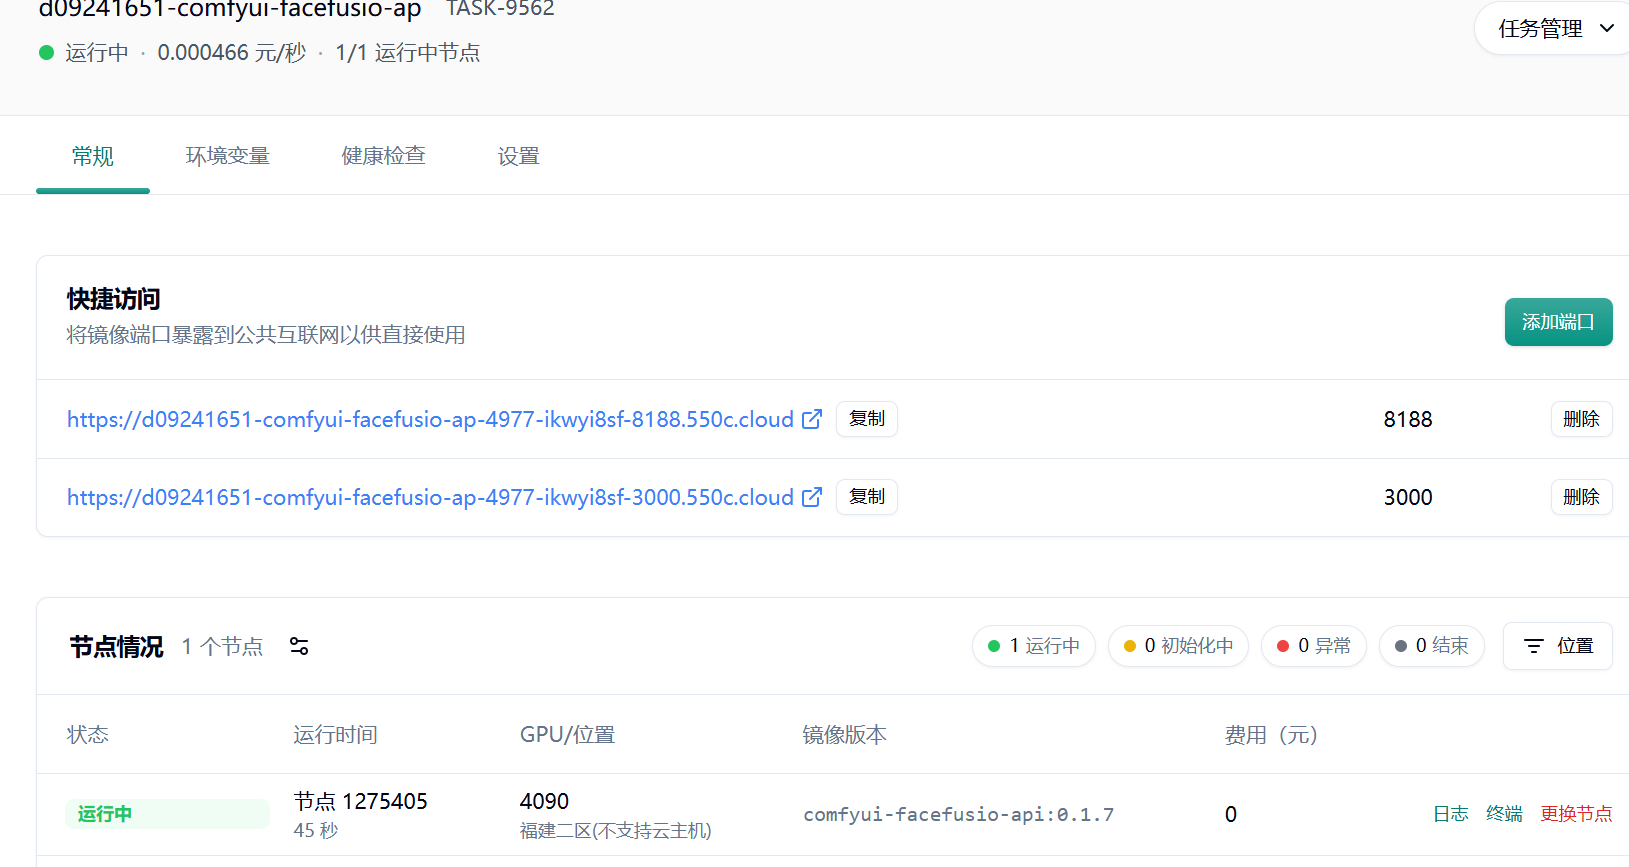
这时我们需要记住暴露出的服务 URL (需要根据自己的实际替换)
https://d09241651-comfyui-facefusio-ap-4977-ikwyi8sf-8188.550c.cloud
https://d09241651-comfyui-facefusio-ap-4977-ikwyi8sf-3000.550c.cloud
通过 api 调用服务:
Section titled “通过 api 调用服务:”Step 1: 编码图片
Section titled “Step 1: 编码图片”我们共需要两张图片
一张为脸部图片:face_image
一张为代替换的图片:body_image
我们将要从 face_image 中提取脸部,然后将提取的脸部融合入 body_image 中
我们先将两张图片都转化为 base64 编码然后放入下述结构中中
body_image = { "data": "图片的 base64 编码"}face_image = { "data": "图片的 base64 编码"}Step 2: 合并成 comfyui 工作流
Section titled “Step 2: 合并成 comfyui 工作流”我们将 body_image 与 face_image 添加到下面的 worlflow_json
worlflow_json = { "1": { "inputs": { "enabled": True, "swap_model": "inswapper_128.onnx", "facedetection": "retinaface_resnet50", "face_restore_model": "codeformer-v0.1.0.pth", "face_restore_visibility": 1, "codeformer_weight": 0.5, "input_image": [ "2", 0 ], "face_model": [ "2", 1 ], "face_boost": [ "3", 0 ] }, "class_type": "ReActorFaceSwapOpt", "_meta": { "title": "ReActor 🌌 Fast Face Swap [OPTIONS]" } }, "2": { "inputs": { "faceswap_weight": "75%", "input_image": [ "10", 0 ], "source_image": [ "12", 0 ] }, "class_type": "ReActorSetWeight", "_meta": { "title": "ReActor 🌌 Set Face Swap Weight" } }, "3": { "inputs": { "enabled": True, "boost_model": "none", "interpolation": "Bicubic", "visibility": 1, "codeformer_weight": 0.5, "restore_with_main_after": True }, "class_type": "ReActorFaceBoost", "_meta": { "title": "ReActor 🌌 Face Booster" } }, "6": { "inputs": { "bbox_model_name": "bbox/face_yolov8m.pt", "bbox_threshold": 0.5, "bbox_dilation": 10, "bbox_crop_factor": 3, "bbox_drop_size": 10, "sam_model_name": "sam_vit_b_01ec64.pth", "sam_dilation": 0, "sam_threshold": 0.93, "bbox_expansion": 0, "mask_hint_threshold": 0.7, "mask_hint_use_negative": "False", "morphology_operation": "dilate", "morphology_distance": 0, "blur_radius": 9, "sigma_factor": 1, "image": [ "10", 0 ], "swapped_image": [ "1", 0 ] }, "class_type": "ReActorMaskHelper", "_meta": { "title": "ReActor 🌌 Masking Helper" } }, "8": { "inputs": { "images": [ "6", 2 ] }, "class_type": "PreviewImage", "_meta": { "title": "Preview Image" } }, "9": { "inputs": { "images": [ "6", 3 ] }, "class_type": "PreviewImage", "_meta": { "title": "Preview Image" } }, "10": { "inputs": body_image, "class_type": "LoadImageFromBase64", "_meta": { "title": "body Image From Base64" } }, "11": { "inputs": { "filename_prefix": "face", "images": [ "6", 0 ] }, "class_type": "SaveImage", "_meta": { "title": "Save Image" } }, "12": { "inputs": face_image, "class_type": "LoadImageFromBase64", "_meta": { "title": "face Image From Base64" } }}Step 3: 发送请求
Section titled “Step 3: 发送请求”提示通过 POST 提交到服务器,URL 为
https://d09241651-comfyui-facefusio-ap-4977-ikwyi8sf-3000.550c.cloud/prompt (上述生成的 3000 端口的转发 url)
{ "prompt": worlflow_json,}Step 4: 解析返回
Section titled “Step 4: 解析返回”请求发送后得到响应:
{ "id": "string", "prompt": { "additionalProp1": { "inputs": "string", "class_type": "string", "_meta": "string" }, "additionalProp2": { "inputs": "string", "class_type": "string", "_meta": "string" }, "additionalProp3": { "inputs": "string", "class_type": "string", "_meta": "string" } }, "images": [ "string" ], "filenames": [ "string" ], "status": "ok"}其中的 images 即包含返回图片的 Base64 编码。