容器化部署 Flux.1-dev 文生图模型
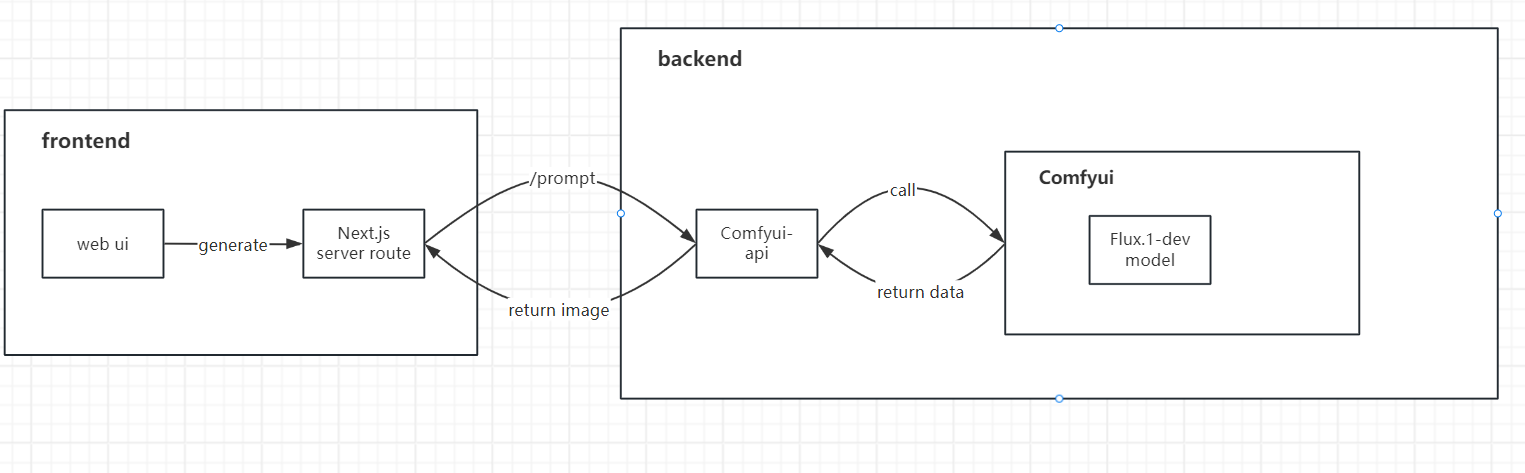
本指南详细阐述了将 Flux.1-dev 基于comfyui-api 封装成 API,构建镜像并使其能够直接在 Docker 容器环境中运行的方法,同时也介绍了如何在共绩算力上部署 Flux.1-dev 模型应用。
我们基于本教程开源了一套前端 Flux.1-dev 文生图服务网站解决方案。
具有完整的 Docker&Serverless 化部署方案,您可以参考使用。
项目地址:https://github.com/slmnb-lab/Flux-Site
- Docker
- NVIDIA GPU(当前演示工作流推荐 24G 显存及以上)
- 足够的磁盘空间(100G~200G)用于存储模型、镜像以及构建缓存
(一)下载模型文件
Section titled “(一)下载模型文件”我们所需的模型文件共有四个,下载链接分别如下,分别将其下载至本地: https://huggingface.co/comfyanonymous/flux_text_encoders/resolve/main/clip_l.safetensors?download=true
https://huggingface.co/black-forest-labs/FLUX.1-schnell/resolve/main/ae.safetensors?download=true
https://huggingface.co/black-forest-labs/FLUX.1-dev/resolve/main/flux1-dev.safetensors
注意,如果你的显存低于 32GB,建议将上述文件中的 t5xxl_fp16.safetensors 替换为下面的低配版模型 t5xxl_fp8_e4m3n.safetensors(后续工作流中对应修改一下模型名即可),下面的案例中我们将使用低配版模型作为示例: https://huggingface.co/comfyanonymous/flux_text_encoders/resolve/main/t5xxl_fp8_e4m3fn.safetensors?download=true
(二)创建 Dockerfile 文件
Section titled “(二)创建 Dockerfile 文件”一个合适的 docker 基础镜像能帮助我们节省大量的时间,同时还能大大减少我们构建出错的概率。这里我们选择comfyui-api开源库的官方镜像作为我们的基础镜像,其预装了 comfyui 及 comfyui-api 以及基础的运行环境依赖。
我们最终的需要 Dockerfile 文件内容如下,请新建一个名为 Dockerfile 的文件(注意无后缀),通过任意编辑器打开,将下面的内容复制进去。
FROM ghcr.io/saladtechnologies/comfyui-api:comfy0.3.29-api1.8.3-torch2.6.0-cuda12.4-runtime

ENV COMFYUI_PORT=8188 \    MODEL_DIR=/opt/ComfyUI/models \    BASE=""

RUN mkdir -p ${MODEL_DIR}/{loras,vaes,text_encoders,diffusion_models}

COPY diffusion_models/*.safetensors ${MODEL_DIR}/diffusion_models/COPY vae/*.safetensors ${MODEL_DIR}/vae/COPY text_encoders/*.safetensors ${MODEL_DIR}/text_encoders/

EXPOSE ${COMFYUI_PORT}
(三)创建目录
Section titled “(三)创建目录”创建目录是为了便于我们指定路径,请按照下面的路径放置上述的文件。
comfyUI/
└── Dockerfile
├── diffusion_models/
│ └── flux1-dev.safetensors
├── text_encoders/
│ ├── clip_l.safetensors
│ └── t5xxl_fp8_e4m3fn.safetensors
├── vae/
│ └── ae.safetensors
(四)执行构建
Section titled “(四)执行构建”进入 comfyuiUI 目录,打开控制台,执行如下命令 (可根据需要自行修改标签和镜像名):
docker build -t comfyui-flux:0.1 .耐心等待构建完毕,最终生成的镜像体积约 42GB。
(五)本地测试(推荐)
Section titled “(五)本地测试(推荐)”虽然即使不经过本地测试也可以直接上传使用,但本地测试可以更快的预览镜像构建效果,还能提前排除可能的一些问题,避免构建过程中的错误在上传远程仓库后才发现。
我们可以在任意位置打开控制台,键入以下指令:
docker run --rm --gpus all -p 3000:3000 comfyui-flux:0.1当容器运行完毕后,,我们可以通过 API 来判断其是否正常工作。
获取 API 文档
Section titled “获取 API 文档”我们可以打开浏览器,网址栏输入http://localhost:3000/docs,即可打开默认的 comfyui-api 基于 swagger 的文档页面,如下图所示:
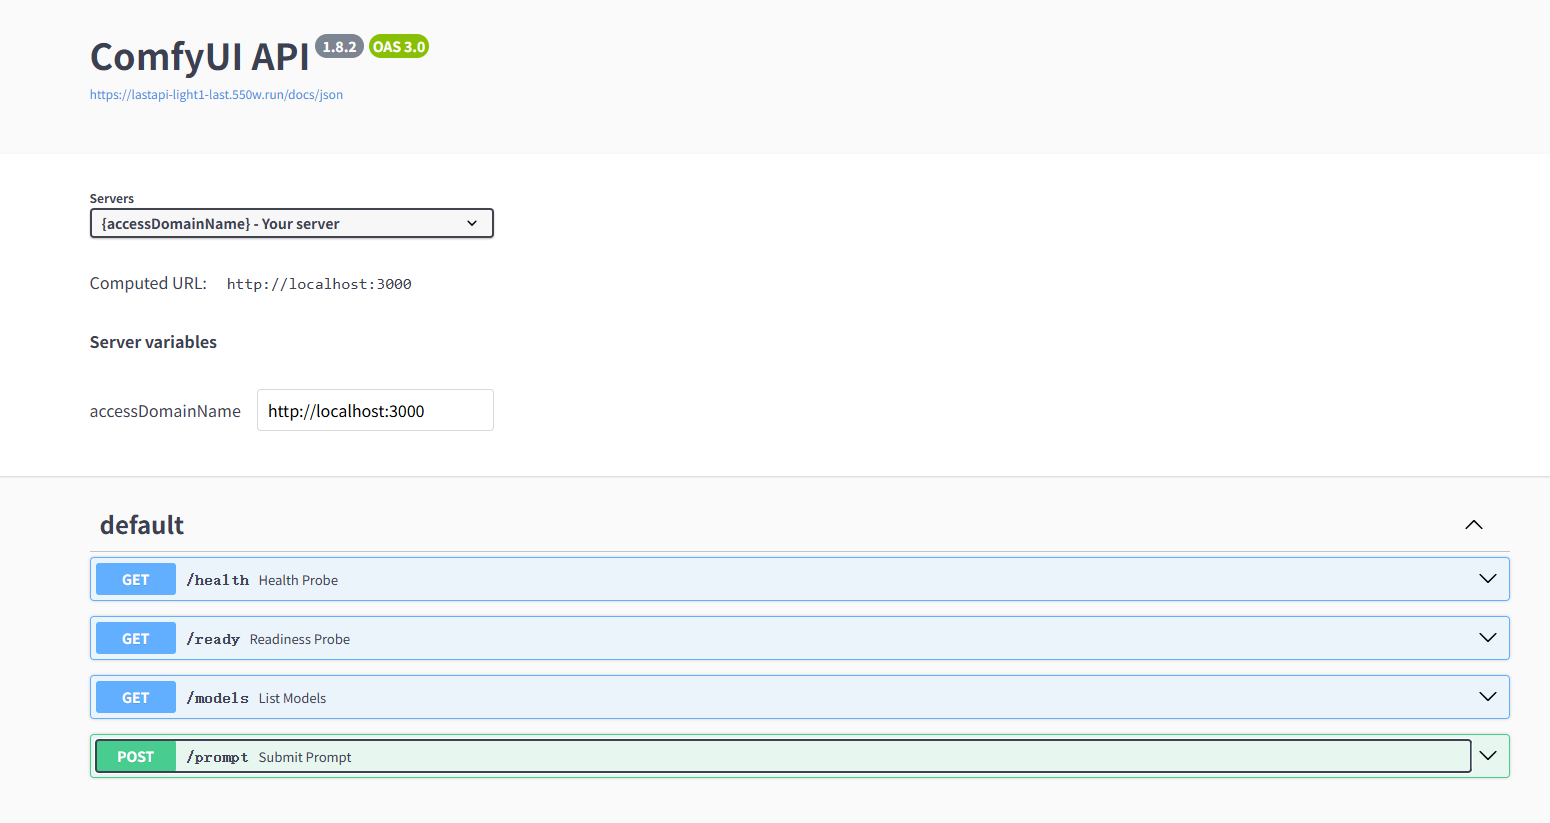
其中介绍了我们可以使用的 4 个常用方法,可自行了解详情。
测试生图接口
Section titled “测试生图接口”接下来我们需要测试镜像容器的生图功能——当然也是最重要的功能。这一步推荐使用 PostMan 这类 API 测试工具,以下将以 PostMan 作为示例:
(1)创建请求
Section titled “(1)创建请求”新建一个请求,将其请求方法设置为 POST,并键入http://localhost:3000/prompt作为请求的 URL。
(2)选择参数
Section titled “(2)选择参数”找到下方的body栏,点击raw一项,并选择右侧的类型为JSON。在下方键入我们的 JSON 参数。
我们所需的参数如下,prompt 对应的是 comfyui 的工作流内容(API 形式)如果有自定义需要,我们也可以修改其中的参数值。
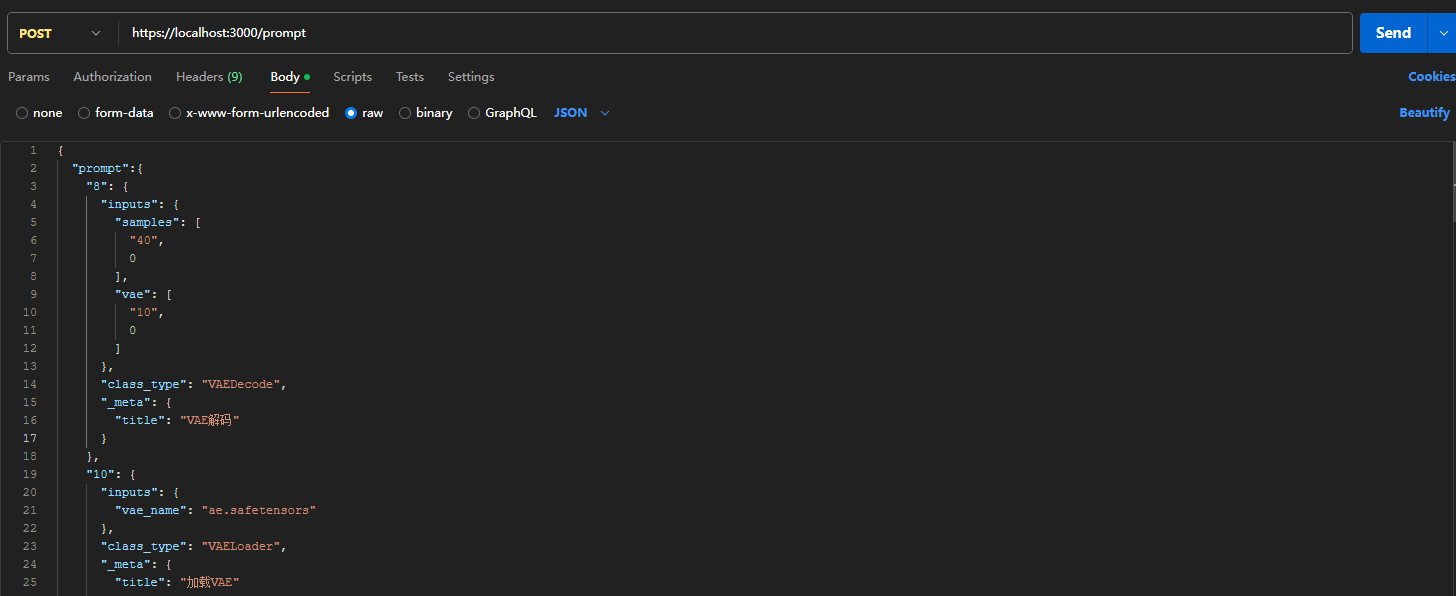
{ "prompt":{ "8": { "inputs": { "samples": [ "40", 0 ], "vae": [ "10", 0 ] }, "class_type": "VAEDecode", "_meta": { "title": "VAE解码" } }, "10": { "inputs": { "vae_name": "ae.safetensors" }, "class_type": "VAELoader", "_meta": { "title": "加载VAE" } }, "11": { "inputs": { "clip_name1": "t5xxl_fp8_e4m3fn.safetensors", "clip_name2": "clip_l.safetensors", "type": "flux", "device": "default" }, "class_type": "DualCLIPLoader", "_meta": { "title": "双CLIP加载器" } }, "17": { "inputs": { "scheduler": "normal", "steps": 25, "denoise": 1, "model": [ "46", 0 ] }, "class_type": "BasicScheduler", "_meta": { "title": "基本调度器" } }, "38": { "inputs": { "model": [ "46", 0 ], "conditioning": [ "42", 0 ] }, "class_type": "BasicGuider", "_meta": { "title": "基本引导器" } }, "39": { "inputs": { "filename_prefix": "FluxEz", "images": [ "8", 0 ] }, "class_type": "SaveImage", "_meta": { "title": "保存图像" } }, "40": { "inputs": { "noise": [ "45", 0 ], "guider": [ "38", 0 ], "sampler": [ "47", 0 ], "sigmas": [ "17", 0 ], "latent_image": [ "44", 0 ] }, "class_type": "SamplerCustomAdvanced", "_meta": { "title": "自定义采样器(高级)" } }, "42": { "inputs": { "guidance": 3.5, "conditioning": [ "43", 0 ] }, "class_type": "FluxGuidance", "_meta": { "title": "Flux引导" } }, "43": { "inputs": { "text": "beautiful photography of a gonger haired artist with Lots of Colorful coloursplashes in face and pn her hands, she is natural, having her hair in a casual bun, looking happily into camera, cinematic,", "clip": [ "11", 0 ] }, "class_type": "CLIPTextEncode", "_meta": { "title": "CLIP文本编码" } }, "44": { "inputs": { "width": 1024, "height": 1024, "batch_size": 1 }, "class_type": "EmptySD3LatentImage", "_meta": { "title": "空Latent图像(SD3)" } }, "45": { "inputs": { "noise_seed": 454905699352480 }, "class_type": "RandomNoise", "_meta": { "title": "随机噪波" } }, "46": { "inputs": { "max_shift": 1.15, "base_shift": 0.5, "width": 1024, "height": 1024, "model": [ "48", 0 ] }, "class_type": "ModelSamplingFlux", "_meta": { "title": "采样算法(Flux)" } }, "47": { "inputs": { "sampler_name": "euler" }, "class_type": "KSamplerSelect", "_meta": { "title": "K采样器选择" } }, "48": { "inputs": { "unet_name": "flux1-dev.safetensors", "weight_dtype": "default" }, "class_type": "UNETLoader", "_meta": { "title": "UNet加载器" } } }}(3)发送请求
Section titled “(3)发送请求”请求返回的结果应该如下:
{ "id": "63c4114c-108a-4178-a37b-e53334607805", "prompt"://你的工作流参数, "images": []//返回的图片数组,}(六)推送镜像到平台
Section titled “(六)推送镜像到平台”这一步会将上一步中自定义的镜像上传到我们的镜像仓库服务中。请参考文档进行:https://www.gongjiyun.com/docs/docker/harbor.html
(七)部署服务
Section titled “(七)部署服务”访问共绩算力控制台 https://dockerweb.gongjiyun.com, 点击新建任务。
Section titled “访问共绩算力控制台 https://dockerweb.gongjiyun.com, 点击新建任务。”
填写基本信息和 Docker Compose
Section titled “填写基本信息和 Docker Compose”我们所选用的基础镜像以 CUDA 12.4 为基础,但此镜像依旧能够选择更高的 CUDA 版本,cuda 版本通常具备向下兼容性。
建议选择节点数量在 3 个以上。在显卡方面,推荐使用 4090,当前任务最低要求为显存在 16G 以上的显卡。

项目所需的 docker-compose 文件如下,可供参考:
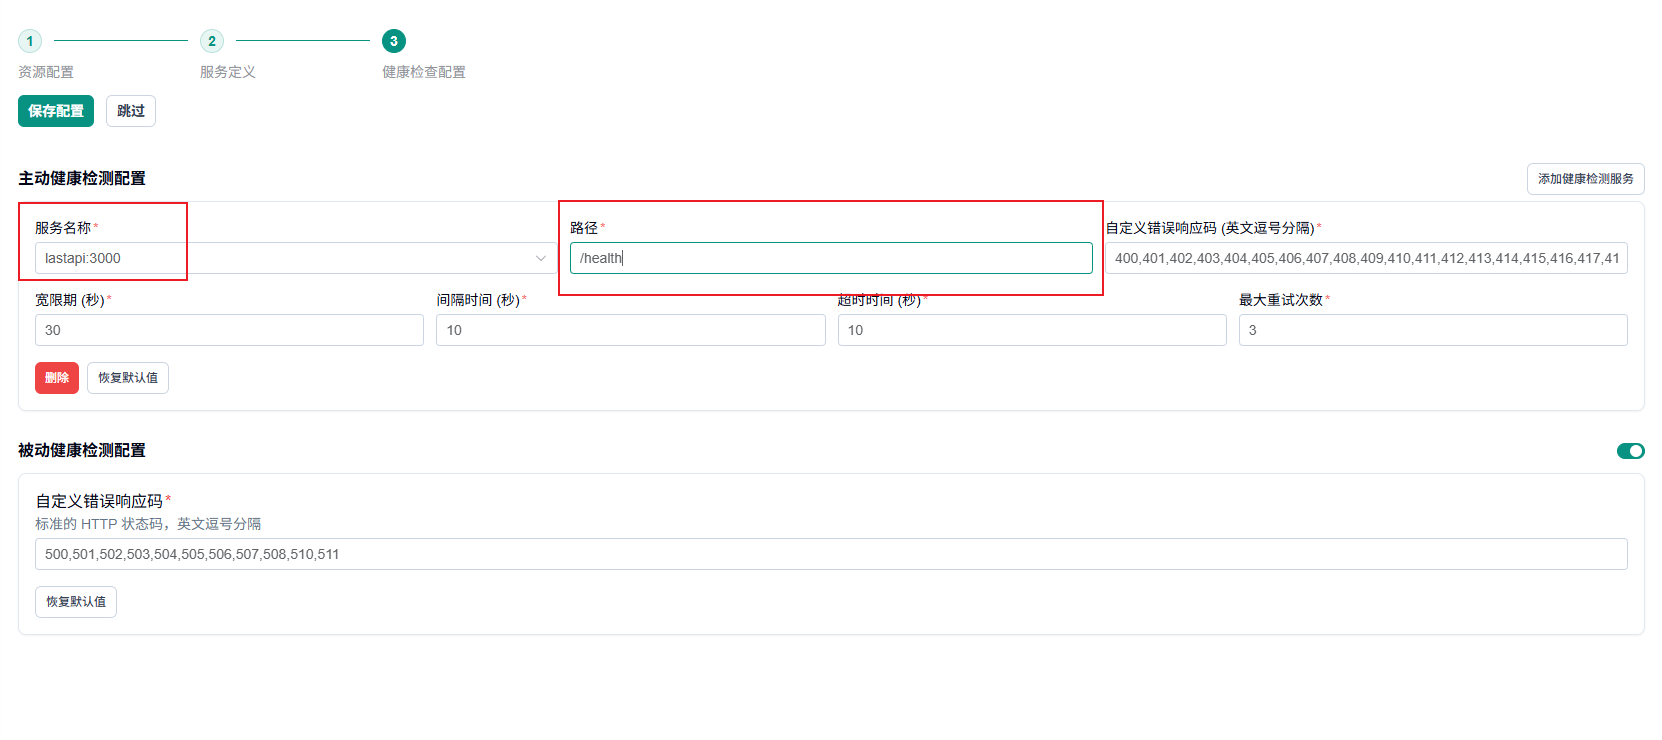
version: '3.9'services: comfyui: image: harbor.suanleme.cn/light1/comfyui-flux:0.30 #这里修改为你上传镜像的地址和标签 ports: - "3000:3000" labels: # 转发端口 - suanleme_0.http.port=3000 - suanleme_0.http.prefix=lastapi deploy: resources: reservations: devices: - driver: nvidia # 使用 NVIDIA GPU 驱动 count: 1 # 预留的 GPU 数量 capabilities: [ gpu ] # 指定 GPU 功能接下来,我们选择健康配置,该配置可供平台检测服务的健康状态。当前镜像的 API 服务已完成对 health check 接口的封装。修改路径为对应的“/health”。该 API 服务对应 3000 端口。配置完成后点击保存配置。
等待节点部署
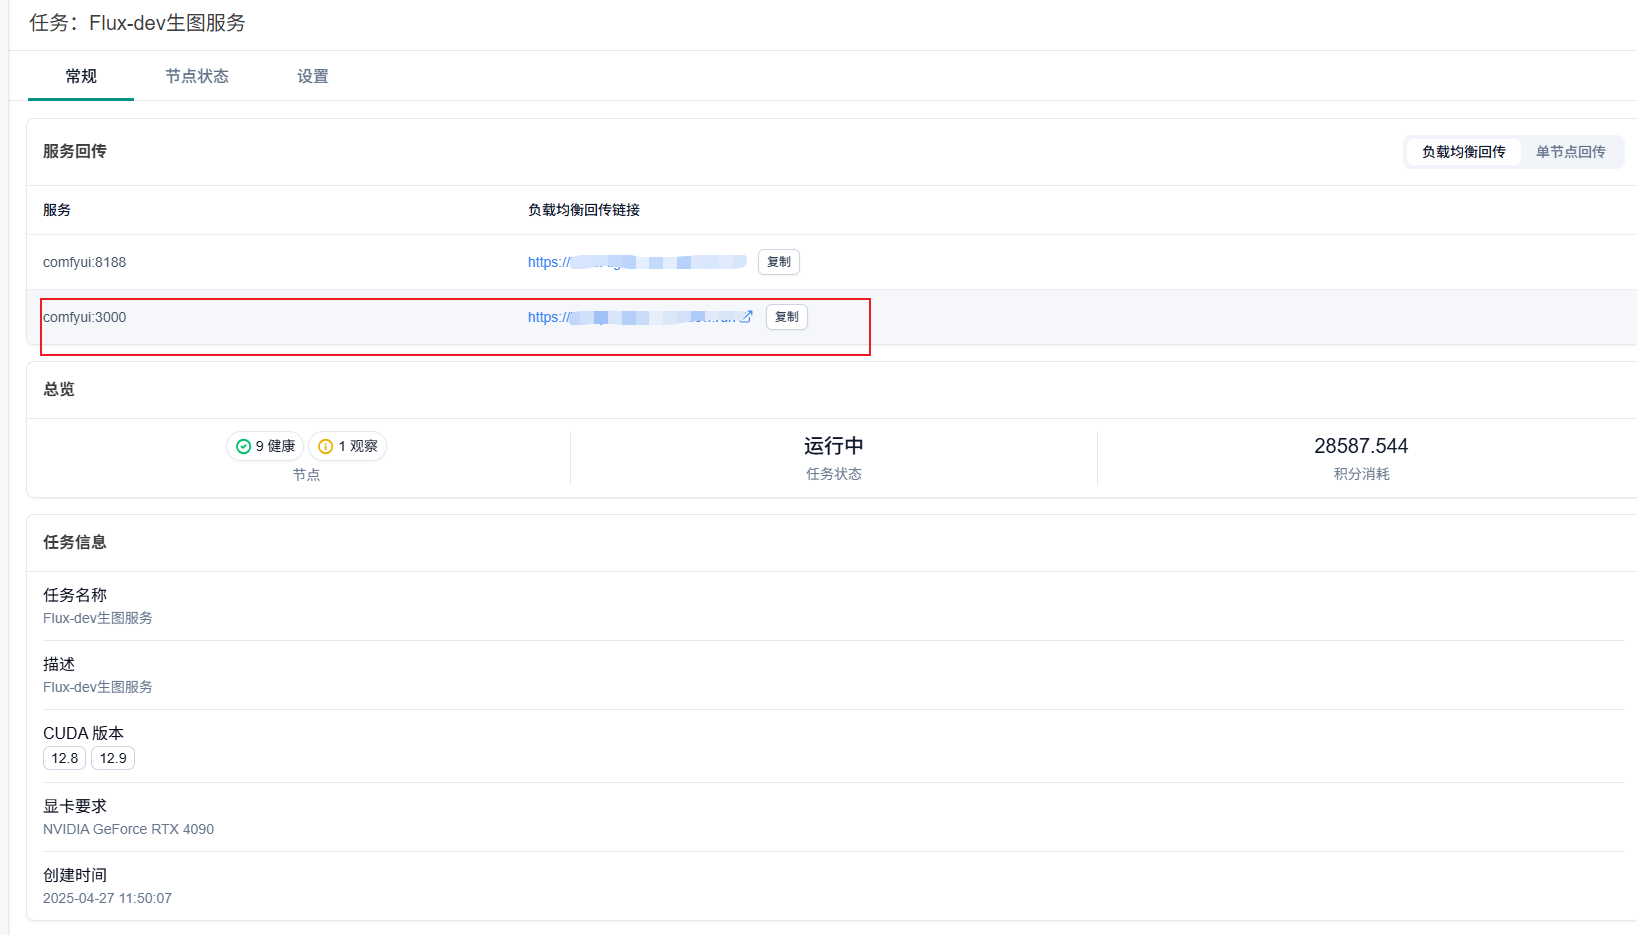
Section titled “等待节点部署”由于镜像体积较大,我们需要耐心等待一段时间,部署完成后页面显示如下图。节点分配完成后,可以通过回传链接访问服务:
FluxEz是基于此模式开发的 Flux.1-dev 在线文生图服务网页应用,您可前往该站点进行体验。